A beautiful home is built from the details, and finish trim carpentry can be one of the most transformative aspects of any interior. At Hollywood Refinishing, we believe that a well-done trim job can elevate your home’s character, providing an elegant, polished look. Whether you’re adding crown molding, window casings, baseboards, or intricate wall trim, these techniques bring out the architectural beauty in every room. Here’s a step-by-step guide to help you get started and some professional tips to ensure your trim carpentry stands out.

What Is Finish Trim Carpentry?
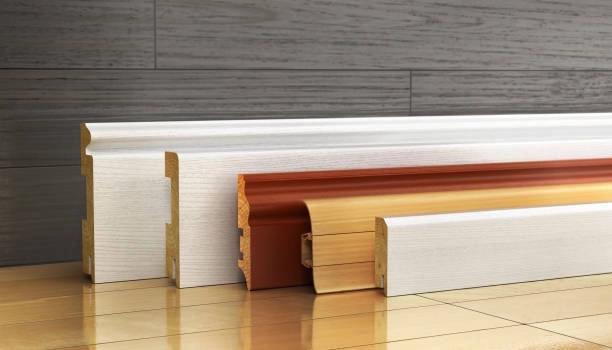
trim carpentry encompasses all the detailed woodwork added to a home after construction essentials like drywall, insulation, and wiring are complete. It includes adding interior and exterior doors, window casings, baseboards, wainscoting, crown molding, and more. Finish carpentry differs from rough carpentry (the structural framework of a house) and requires precision and an eye for design, often making the difference between an ordinary and an extraordinary room.
With these techniques, you can add personality to any room, improving both form and function.
Step 1: Gather Essential Tools and Materials
To start a trim project, you’ll need a few basic tools:
- Measuring tape (or better yet, a rigid ruler or folding rule for shorter lengths)
- Miter saw for cutting precise angles
- Nail gun (Brad or finish nails work well)
- Combination square for small measurements and consistent reveals
- Wood putty to cover any minor imperfections
- Caulking gun for seamless edges
Having quality tools on hand can make a big difference in the accuracy and outcome of your work, especially in finish trim carpentry. Investing in a reliable miter saw or a precision ruler can streamline each cut and elevate the results. The right tools not only save time but also enhance the overall quality of your craftsmanship.
Step 2: Marking and Cutting Without Measurements
A useful technique in trim carpentry is to avoid using numbers as much as possible. Instead of measuring and transferring measurements, try to mark pieces directly in place. This approach minimizes errors, especially when working with multiple cuts or fitting trim around challenging spaces.
Hold the trim piece up where it will be installed, and mark the length directly on the board—a simple yet effective approach in finish trim carpentry. Using a rigid folding ruler for shorter distances helps prevent issues that tape measures often cause, like flexing and bending. This straightforward tip makes custom trim and molding installation faster and more precise.
Step 3: Focus on Reveals and Avoid Flush Edges
In finish trim carpentry, “reveals” are small setbacks on trim edges that create shadows, accentuating the lines of the trim while concealing minor imperfections. A slight setback between trim and door or window frames adds depth, making any misalignment less noticeable. When casing windows or doors, aim for a small reveal, typically around ¼ inch.
Flush edges, on the other hand, can lead to misalignment over time due to natural wood movement and house settling. By focusing on reveals, you add dimension and increase the trim’s durability against visible imperfections.
Step 4: Fit Joints Carefully Before Final Cuts
In finish trim carpentry for homes, especially when working with baseboards, crown moldings, or chair rails, it’s essential to test-fit joints before making final cuts. For example, if you’re coping or mitering a joint on crown molding, ensure it fits snugly before trimming the other end to its final length. This approach provides room for adjustments and minimizes wasted material, making for a smoother installation.
Step 5: Coped Joints for Inside Corners
Coping is an excellent technique for joining trim in inside corners. A coped joint involves cutting the end of one board to fit over the contour of another. This technique is particularly useful for baseboards and crown molding because it creates a tight, seamless fit in corners and is more forgiving with the natural shifting of wood over time.
To cope a joint:
- Start with a 45-degree cut on one piece.
- Use a coping saw to trim along the cut edge.
- Fit it against the adjacent piece for a tight finish.
With a bit of practice, coping adds a professional look to your trim carpentry and avoids the hassle of trying to make perfect miters on every inside corner.

Step 6: Install Baseboards and Crown Molding with Parallel Alignment
In finish trim carpentry, parallel alignment is often more important than perfect levelness. Baseboards should run parallel to the floor, even if the floor isn’t completely level. Similarly, crown molding should run parallel to the ceiling line. The human eye detects diverging lines more easily than level discrepancies, so prioritizing parallel lines creates a cleaner appearance.
For rooms where the floor or ceiling is not perfectly level, trim the bottom edges of the baseboards or the top edges of crown molding to follow the line of the room, rather than holding them strictly level.
Step 7: Conceal Imperfections with Molding and Returns
Professional finish trim carpentry services employ techniques that conceal imperfections, resulting in a polished, seamless look. A common trick is using returns—small pieces of trim that cap off exposed end grain. End grain tends to absorb stain and paint differently than flat grain, often creating uneven finishes if left exposed. By installing returns at the ends of window stools or stair treads, you can effectively hide the end grain and maintain a clean, cohesive aesthetic.
Additionally, small imperfections can be hidden with caulking and wood putty. Use caulk for gaps along edges, and wood putty to fill any nail holes. Once sanded and painted, these tiny fixes help maintain a smooth, unified finish.
Step 8: Plan and Sequence Your Installation for Best Results
In finish trim carpentry, planning your installation in a logical sequence can minimize the need for multiple precise cuts and enhance the overall look. For example, when casing a window or door, start with the side pieces and complete it with the top piece. This approach ensures that only the top piece’s miters need to be perfectly cut, saving both time and effort.
Similarly, when installing crown molding or baseboards around a room, work clockwise or counterclockwise, especially if you are coping joints. This flow prevents tricky double-coped cuts in corners and results in a cleaner, faster installation.
Step 9: Remember That Every Detail Matters
In finish trim carpentry, every nail and angle placement contributes to the final outcome. Paying close attention to details like nail placement, and ensuring they align evenly across boards, can make all the difference. These small touches ultimately define the look and feel of high-quality craftsmanship, creating a polished and professional finish.
Step 10: Complete the Job Don’t Skip the Final Touches
Once the main installation is done, it’s essential to go through a final checklist. Fill all nail holes, touch up with paint, and ensure caulked edges are smooth and seamless. These finishing steps are critical for a truly professional look.
Trust Hollywood Refinishing for Expert Trim Carpentry Services
If finish trim carpentry feels like too big a task, Hollywood Refinishing’s expert team is here to help. We specialize in custom trim and molding installations, offering professional services that transform your home’s interiors with style and precision. With over 20 years of experience, our licensed and insured team excels in every detail of finish carpentry, from precise cuts to seamless installations. Reach out to Hollywood Refinishing today for a consultation and let us bring your vision to life.

In conclusion, finish trim carpentry offers a way to transform any room by adding beautiful, detailed touches that enhance your home’s character and elegance. With each step, from choosing quality tools to finishing with precise joints and seamless edges, you can achieve a professional look that truly stands out. These techniques help make baseboards, crown moldings, and window casings cohesive elements in your space, adding depth and personality. If you’re ready to elevate your home’s interior with expert trim carpentry, contact us today to discuss your vision and let our skilled team bring it to life.
Frequently Asked Questions
1. What is finish trim carpentry, and why is it important for home interiors?
Trim carpentry adds detailed woodwork, like baseboards, crown moldings, and window casings, to a home’s interior after the main construction. This type of carpentry enhances the character and elegance of each room, making spaces look refined and well-crafted. It’s a key part of transforming a room from ordinary to extraordinary.
2. What tools are essential for a successful finish trim carpentry project?
Essential tools for trim carpentry include a measuring tape or rigid folding ruler, a miter saw for accurate angle cuts, a nail gun, a combination square for precision, wood putty for covering small imperfections, and a caulking gun for neat edges. Having quality tools helps achieve precise, professional results.
3. How can I improve the accuracy of my trim cuts?
One effective technique is to mark the length directly on the trim where it will be installed, rather than relying solely on measurements. This approach minimizes errors and ensures each cut is aligned perfectly for the space, especially helpful when dealing with irregularities or multiple cuts.
4. What are “reveals” in finish trim carpentry, and why are they used?
“Reveals” are slight setbacks on trim edges that create shadows, highlighting the trim lines and concealing minor imperfections. Leaving a small reveal between trim and window or door frames adds depth and makes any slight misalignments less noticeable, creating a polished and professional appearance.
5. Why is it recommended to test-fit joints before making final cuts?
Test-fitting joints, especially for crown molding and baseboards, allow you to check for a snug fit before committing to the final cut. This method reduces material waste and gives you the opportunity to make adjustments, ensuring a more accurate and visually pleasing fit in the finished work.
6. What is coping, and why is it useful for inside corners in finish trim carpentry?
Coping is a technique where one trim piece is cut to fit over the contour of another, creating a tight joint in the inside corners. This approach is ideal for baseboards and crown molding because it accommodates natural shifts in wood, resulting in a clean, durable joint that holds up over time.
7. How can I hide imperfections on exposed trim ends?
Using returns, small pieces of trim that cap off exposed end grain help hide imperfections. End grain tends to absorb paint and stain unevenly, creating a less polished look if left exposed. Adding returns ensures a cohesive, finished appearance, especially on areas like window stools and stair treads.


